Ian Rich
Baby's First Retopo
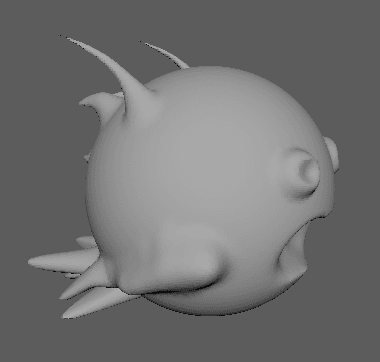
This was my first go at retopologizing a sculpt from ZBrush using Maya and the Quad Draw tool. I had a student diving into ZBrush who wanted to get her blobby character models into her team's WebVR game, so I quickly whipped together my own little character in a similar style to what my student was going for - with spherical base shapes and antennae/sticky-outy things. The goal being to practice the retopologizing workflow, no more than a few minutes were spent on the Zbrush sculpt. I do love the little guy, though - Hello whoaFish!
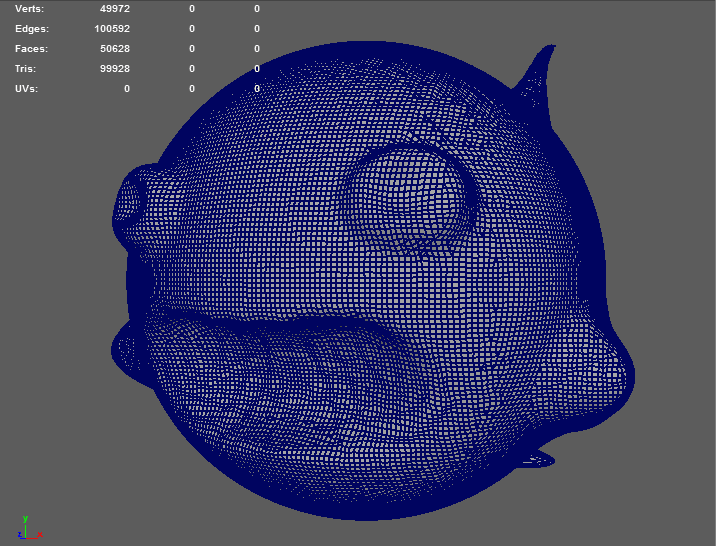
Looking at the imported OBJ file of the sculpt, we're clocking in at about 50k vertices, certainly too heavy for Mr. Whoa. To aid in performance while retopoing, I followed the advice from [tutorial] and made a GPU cache of the geometry, which provides an Alembic file you can import into the scene. The GPU Cache node that results can be used with the Make Live and Quad Draw tools, with which all retopo goodness is possible. With the GPU Cache, Maya does not have to evaluate it through its dependency graph like a normal node. Instead, it routes the data directly to the graphics card. Neat!
All you need to do is execute Cache->GPU Cache->Export(All/Selection) to save your cache file. Then you do Cache->GPU Cache->Import to use it in your scene. The original geometry can be discarded (or just make a fresh scene for the import). It's a good idea to put the cache object in its own layer, so you can hide it and view your new geometry solo later on.
The next step is to execute Make Live on the cache object, then go to town with the Quad Draw tool! A good workflow tip I learned was to focus on the important areas and fussy bits first, as isolated shells. Once those are set up, it will be more clear how to go about connecting everything now that you can see the waypoints you must hit with your edge flow. I also really liked Alex's method of doing conical, or extruded features, where you click out eight vertices around the tip of the shape, then place one vert in the center, giving you four quads. You can then use those eight points to initiate edges that run down the length of the shape in a nicely distributed manner. Take a look at the model up top to see what I'm talking about.
Fun and meditative times were had with this workflow - it's a fun puzzle to crawl around a model and try to map out an efficient and sensible topology. I think it turned out pretty well if I do say so myself :) It will be fun to take a crack at a production-ready sculpt sometime and see how I fare.
Helpful Things
ZBrush to Maya to ZBrush - Retopology and UVing with Quad Draw - Alex Cheparev
Quad Draw Retopo Demo - pointpusher
Quad Draw / Make Live Workflow - My Oh Maya
Retopologize GPU Cache Node - Maya Docs